
Blog
2:1:1 PF Tek Substrate Ratio for Beginners That Colonizes Reliably

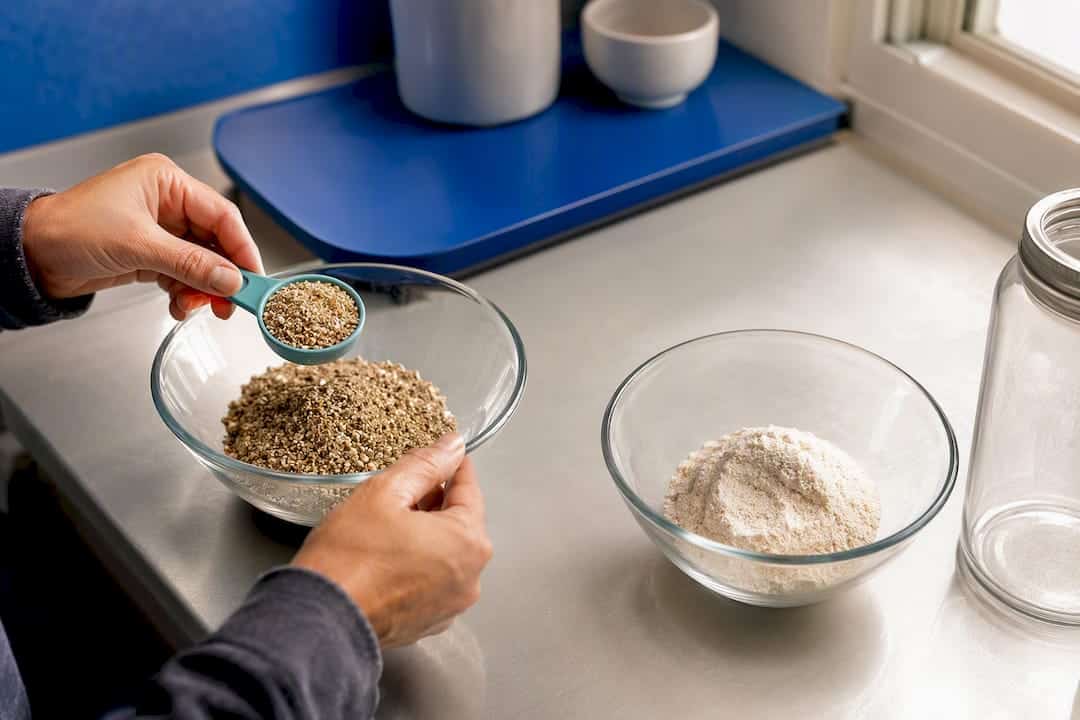
The classic PF Tek substrate ratio is 2 parts vermiculite to 1 part brown rice flour to 1 part water. For a standard half-pint jar, that works out to about 1/2 cup vermiculite, 1/4 cup brown rice flour, and 1/4 cup water. Mix the wet vermiculite first, fold in the flour, fill jars loosely, cap with a 1/2 inch dry vermiculite layer, sterilize, cool completely, inoculate, and let the jars sit in the dark.
TL;DR:
- Using organic brown rice flour reduces the risk of fungicide residue that can halt colonization, making it worth the extra cost.
- Proper mixing involves soaking vermiculite, testing its moisture, then folding in the flour gradually to avoid clumps and dead zones.
- Sterilization with a pressure cooker at 15 psi for 45 minutes is more reliable than steaming, which risks contamination due to uneven heat.
- Inoculate with 1 to 2 cc of spores per jar, working in a sterile environment, and seal injection sites with micropore tape for optimal results.
- Full colonization typically takes 2 to 4 weeks at 70°F to 80°F, with healthy mycelium appearing as fluffy white growth and contamination showing as colored patches.
Table of Contents
- What Goes Into a PF Tek Substrate Recipe?
- How Do You Mix and Fill PF Tek Jars?
- Pressure Cooker vs. Steam Pot: Which Sterilization Method Works Better?
- How Much Spore Solution Do You Inject Per Jar?
- How Long Does PF Tek Take to Colonize?
- Dunking, Rolling, and Setting Up for Fruiting
- What Should You Do When Something Goes Wrong?
- Why PF Tek Still Beats Fancier Methods for Beginners
- Want Fewer Steps and Higher Success Odds?
- Where to Read More on PF Tek Technique
- Sources
What Goes Into a PF Tek Substrate Recipe?
That 2:1:1 ratio isn’t arbitrary. Vermiculite holds water and creates air pockets mycelium needs to breathe; brown rice flour (BRF) supplies the nutrient base fungi actually digest. Get the water content wrong in either direction and you’re either drowning the substrate or starving it, both of which stall colonization before it starts. This exact recipe and its per-jar breakdown show up consistently across step-by-step PF Tek guides, which is why it’s become the default starting point for anyone new to jar cultivation.
Here’s the exact breakdown for a single half-pint (8 oz) wide-mouth jar:
- Vermiculite: 1/2 cup (roughly 120 ml)
- Brown rice flour: 1/4 cup (roughly 60 ml)
- Water: 1/4 cup (roughly 60 ml), plus a bit more for the wet vermiculite portion before mixing
- Dry vermiculite for the top layer: an additional 2 to 3 tablespoons per jar, kept separate and never wetted
Most beginners don’t stop at one jar. Once you know you’ll be running a batch, scale the recipe up rather than mixing single jars over and over.
A few ingredient notes make a real difference in outcome. Organic brown rice flour is worth the extra cost when you can find it, since some growers report conventional flour occasionally carries trace fungicide residue that can slow or inhibit colonization. Use coarse or medium vermiculite rather than the fine horticultural grade sold for seed starting; it holds structure better and won’t compact into mud. Tap water is fine in most municipal systems, but if your water is heavily chlorinated, let it sit out overnight or use filtered water instead.
Gypsum and coffee grounds show up in some advanced PF Tek variations as small nutrient boosters. Neither is required, and for a first run, skip both. Get the base recipe working before you start experimenting with additives. Jar shape matters more than most beginners realize, too. Half-pint, wide-mouth jars without shoulders release finished cakes cleanly; jars with a lip or shoulder near the top tend to trap the cake and cause tearing when you try to dunk and roll it later.
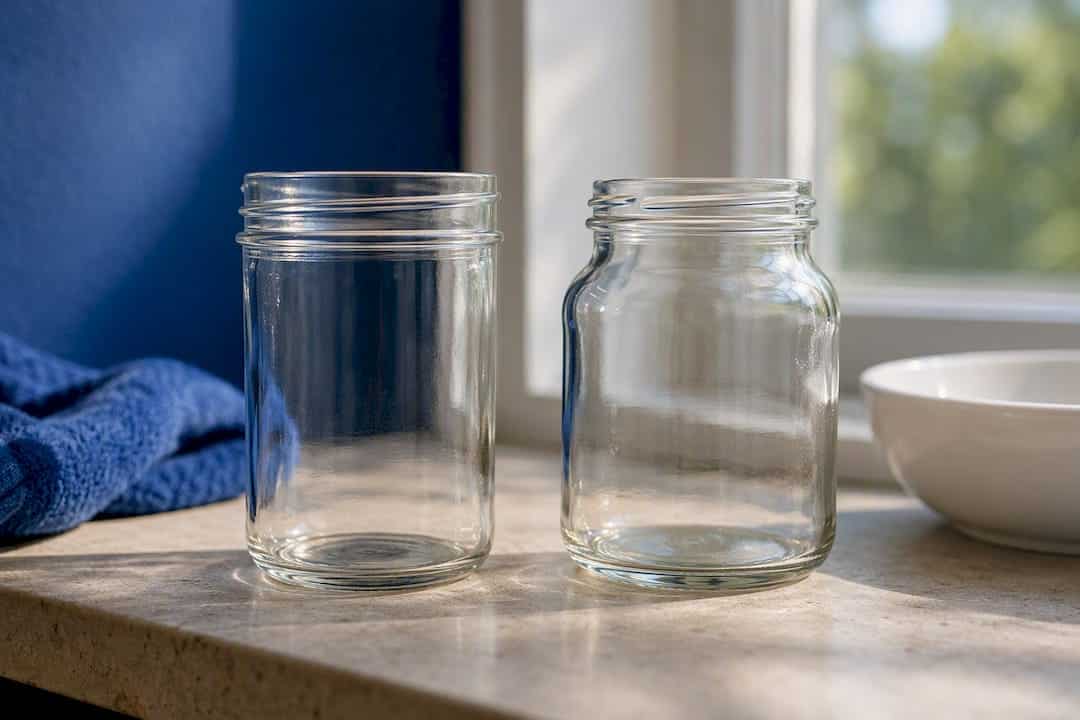
Pro Tip: Measure your dry ingredients before adding water, not after. Once vermiculite is wet, it’s nearly impossible to eyeball how much BRF you’re actually adding by volume.
How Do You Mix and Fill PF Tek Jars?
Mixing order matters more than most first-timers expect, and getting it backward is one of the most common reasons a batch never colonizes.
- Wet the vermiculite first. Combine your measured vermiculite with the water in a bowl and let it sit for a couple of minutes so it absorbs evenly.
- Run the squeeze test. Grab a handful and squeeze firmly. You want only a few drops of water to escape, no more. If water streams out, you’ve added too much; add a spoonful of dry vermiculite to correct it. If nothing comes out at all and the mix feels crumbly, add water a teaspoon at a time.
- Fold in the brown rice flour gradually. Add it in two or three stages, mixing between each addition, rather than dumping it all in at once. This avoids the dense flour clumps that create dead zones mycelium can’t colonize.
- Fill jars loosely. Spoon the mixture in without pressing or tamping. Packing substrate tightly is one of the most common beginner mistakes because compacted substrate blocks gas exchange and mycelium simply stalls inside a jar that looks fine from the outside.
- Leave headspace and wipe the rims. Stop filling about 1/2 inch below the jar’s shoulder, then wipe any substrate off the rim and threads with a clean, damp cloth. Substrate on the rim becomes a contamination bridge once the lid goes back on.
- Add the dry vermiculite cap. Spoon a 1/2 inch layer of dry (unwetted) vermiculite on top and level it gently. Don’t compress this layer either; it needs to stay loose to do its job.
- Prepare the lids. Drill or punch three to four holes around the lid, about 1/4 inch in diameter, spaced evenly. Cover each hole with a small piece of micropore tape or a folded strip of aluminum foil before sterilizing, then screw the lids on loosely, not fully tight, to allow steam to enter during the cook.
Pressure Cooker vs. Steam Pot: Which Sterilization Method Works Better?
A pressure cooker running at 15 psi for 45 minutes is the preferred sterilization method for PF Tek jars, and for good reason: it hits a temperature and pressure combination that reliably kills contaminant spores throughout the substrate, not just on the surface.
Stovetop steaming is the low-equipment fallback. Set jars on a rack or folded towel inside a large pot, so they never touch the metal bottom directly, add a few inches of water, cover tightly, and steam for 60 to 90 minutes. It works, but it carries a higher contamination risk because steaming doesn’t reach the same sustained internal temperature a pressure cooker does. If you go this route, check the water level periodically; a pot that runs dry mid-cook is one of the most common causes of a failed steam sterilization.
A few operational details separate a clean cook from a wasted batch:
- Never let jars touch the pressure cooker or pot’s metal bottom directly. Temperature shock is the leading cause of cracked jars.
- Let pressure release naturally after the timer ends. Venting too fast causes a sudden pressure drop that can crack glass or blow substrate through the lid holes.
- Let jars cool completely to room temperature before inoculating. Warm substrate creates condensation inside the jar, and that moisture is exactly what contaminants need to establish.
- Loosely cover cooling jars with foil to keep airborne dust and mold spores off the lids while they sit.
Colonization timelines run 2 to 4 weeks under ideal conditions, and ideal incubation sits between 70°F and 80°F (21°C to 27°C). Cooking your substrate properly is what makes that window achievable instead of aspirational.
How Much Spore Solution Do You Inject Per Jar?
Inoculation is the step where sterile technique either pays off or falls apart, so treat it with the same care you gave sterilization.
- Sterilize your needle. Flame it with a lighter until it glows, then let it air cool for 10 to 15 seconds. A hot needle will kill your spores on contact.
- Shake the syringe. Spores settle at the bottom of the solution, so agitate the syringe well before drawing or injecting to distribute them evenly.
- Inject 1 to 2 cc per jar, split across the available holes so mycelium establishes from multiple points rather than one corner.
- Work in a still-air box or a draft-free room. A dedicated still-air box (SAB) cuts down airborne contamination significantly compared to open-air inoculation, though a clean, closed room with no fans running is workable for a first attempt.
- Reseal each injection hole with a fresh piece of micropore tape immediately after injecting.
The dry vermiculite cap you added earlier isn’t just filler. It functions as a physical filter and humidity buffer, trapping airborne contaminants before they reach the substrate below while keeping the surface consistently humid for mycelium to push through. That’s also why disturbing it, tapping the jar hard, or scraping the top layer during handling is a leading contamination vector for beginners. Leave it alone once it’s in place.
How Long Does PF Tek Take to Colonize?
Expect visible white growth around the injection sites within 3 to 7 days. Full colonization of the jar typically takes 2 to 4 weeks, and the entire process from inoculation to first harvest usually runs 6 to 8 weeks when temperatures stay in range.
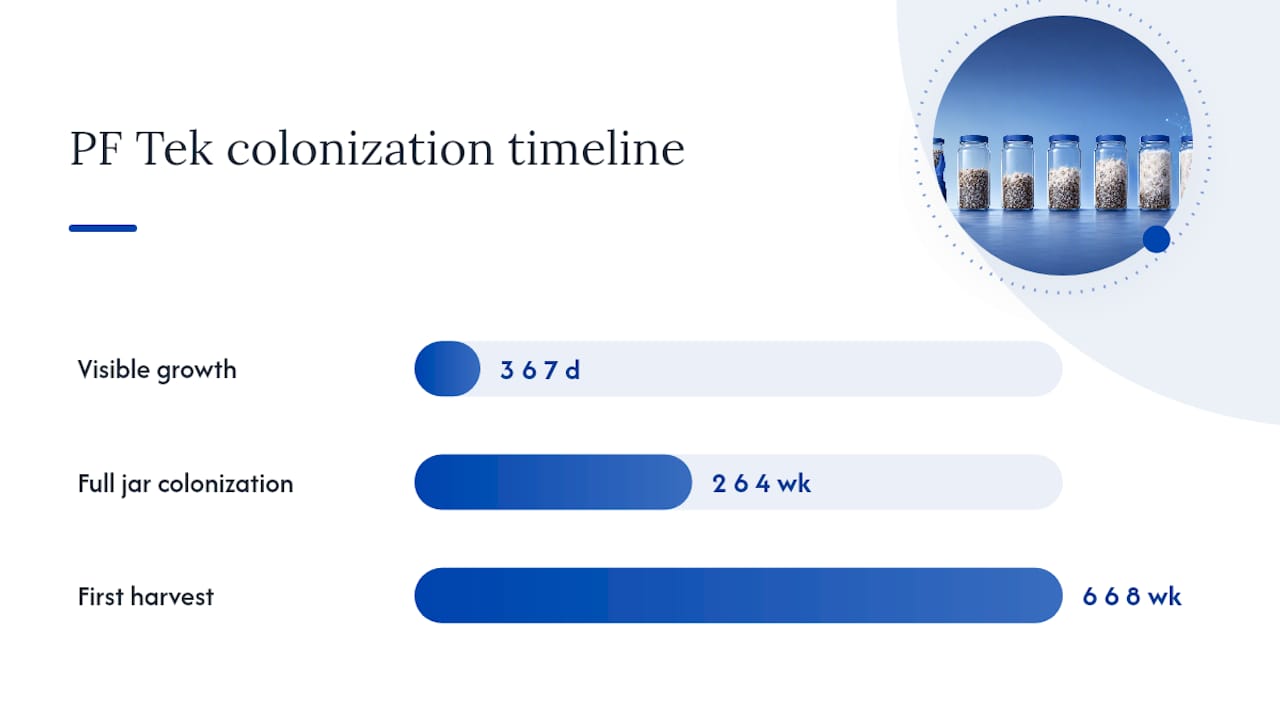
That temperature range, 70°F to 80°F (21°C to 27°C), isn’t a suggestion. Colder incubation slows growth and gives contaminants more time to establish before mycelium can outcompete them. Hotter than 80°F speeds colonization but raises the odds of bacterial issues, especially in a substrate that’s slightly too wet.
Healthy colonization looks like consistent, fluffy white growth radiating outward from each injection point, eventually connecting into a solid white mass. You’ll often see thicker white cords called rhizomorphs pushing through the substrate; that’s a strong sign of vigorous growth, not a problem.
Contamination shows up as color, and color is the tell:
- Green, blue-green, or black fuzzy patches usually mean Trichoderma or Penicillium mold.
- Bright pink or orange slime typically signals bacterial contamination, often from a substrate that was too wet.
- Gray, web-like growth that spreads fast and thin is cobweb mold, a common but usually manageable contaminant if caught early.
If a jar shows no growth and no contamination after two weeks, check your temperature and moisture before assuming the jar failed. Colonies that stall from cold or dryness often resume once conditions are corrected. Never open the jar to “help” mycelium along; that’s an open invitation for contamination. If you see any spreading color, discard that jar rather than trying to salvage it.
Dunking, Rolling, and Setting Up for Fruiting
Once a jar is fully colonized, white mycelium wall to wall with no dry substrate visible, it’s ready to come out and become a fruiting cake.
- Dunk the cake for 12 to 24 hours in cool, non-chlorinated water, refrigerating it during the soak. This rehydrates the cake and typically improves yield on later flushes. If the cake floats, weigh it down gently with a clean plate; don’t force it under with pressure that could crack it.
- Roll the wet cake in dry vermiculite, coating it evenly on all sides, about 1/8 inch thick. This holds moisture at the surface without smothering it.
- Set up a shotgun fruiting chamber. A clear plastic tote with a few inches of moist perlite in the bottom, holes drilled around the sides, provides the humidity and fresh air exchange cakes need to pin. Mist the chamber walls once or twice daily and fan it briefly to exchange stale air.
- Give it indirect light on a normal day/night cycle; mushrooms don’t need bright light, but a schedule helps trigger pinning.
Most cakes produce two to three flushes, with each flush a week or two apart. Dunk again between flushes to rehydrate.
What Should You Do When Something Goes Wrong?
Most PF Tek failures trace back to one of a handful of repeatable mistakes, and catching them early saves the rest of your batch.
- See green, black, or pink growth? Isolate that jar immediately, seal it in a bag before opening anywhere near your other jars, and discard it. Don’t try to cut out contamination and save the substrate; PF Tek jars are small enough that it’s rarely worth the risk.
- Substrate feels compacted or waterlogged? Use less water next batch and stop tamping the substrate down while filling. This is one of the most frequently repeated errors among first-time growers.
- Growth has stalled with no contamination visible? Check incubation temperature first, then moisture. A jar sitting in a chilly closet will colonize far slower than one held at 75°F.
- Cobweb mold (gray, thin, fast-spreading) is manageable if you catch it in the first day or two; some growers scrape it out carefully, though isolating the jar is the safer call for beginners.
- Bacterial blotch (yellow or orange wet-looking patches with a sour smell) almost always means the substrate was too wet going into sterilization. Adjust your water ratio down slightly next time.
A few hygiene habits reduce contamination rates across the board: wipe down your work surface with isopropyl alcohol before every session, wash hands thoroughly, and avoid working near open windows, fans, or high-traffic areas of the house.
Pro Tip: Keep a simple log of your water measurements and sterilization times for each batch. When something goes wrong, that log is the fastest way to figure out what changed.
Why PF Tek Still Beats Fancier Methods for Beginners
PF Tek gets dismissed by more advanced growers who’ve moved on to monotubs and bulk substrate, and for higher-volume growing, they’re right to make that switch. But writing off PF Tek as outdated for a beginner misses the actual point of the method. It’s forgiving. Low-nutrient substrate, small jar volumes, and basic kitchen equipment mean a mistake in ratio or timing costs you one jar, not an entire tub of substrate.
The mistake I see repeated most isn’t a measurement error. It’s impatience. People check jars daily, tap the glass, hold jars up to grow lights every few hours looking for progress, and in doing so they introduce far more contamination risk than a slightly-off water ratio ever would. Colonization on a good jar looks almost boring for the first ten days. That’s normal.
The other thing worth saying plainly: laws around psilocybin cultivation and possession vary significantly by country, state, and even city, so check your local regulations before starting any grow. Fungipsilocybinmushroom’s grow kit guide and lab-tested product line exist precisely because plenty of home growers want a proven, quality-controlled starting point rather than reinventing the wheel with each batch.
— Alex
Want Fewer Steps and Higher Success Odds?
If measuring vermiculite and babysitting a pressure cooker sounds like more equipment risk than you want on your first run, a ready-to-fruit grow kit skips the substrate prep entirely. Fungipsilocybinmushroom’s 100% mycelium grow kit ships fully colonized, so you’re starting at the fruiting stage instead of the inoculation stage, with far less exposure to the contamination risks that trip up first-time PF Tek growers.

The kit arrives with clear setup instructions and the accessories needed to get your first flush going, and it’s built specifically for beginners who want a tested, consistent result without troubleshooting a failed jar mid-batch. If you’ve already run PF Tek and want to compare notes on colonization speed and flush size, the B+ mycelium grow guide walks through what a faster-colonizing strain looks like in practice. Check current availability and place your order through the grow kit product page to get your next batch started with less guesswork than a first PF Tek run typically involves.
Where to Read More on PF Tek Technique
The PF Tek v2 thread on Shroomery remains the most detailed original source for troubleshooting stalled jars and reading incubation timelines correctly. DoubleBlind Magazine’s guide adds historical context on why the method became the standard entry point for home cultivation. For side-by-side photos of substrate consistency and jar setups, Mushroom Growing Tips’ PF Tek walkthrough is worth bookmarking, and SporeLab’s technique page covers sterilization variations in more depth than most beginner guides attempt.
This article is general information, not a substitute for advice from a qualified lawyer. Consult a qualified legal professional about your own circumstances before acting on anything here.
Sources
- Shroomery
- A Mycologist’s Guide to the PF Tek Method — DoubleBlind Magazine
- PSILOCYBE CUBENSIS GROWING TECHNIQUES (PF TEK) — SporeLab
- Growing mushrooms at home — Mother Earth News